Pages

Showing posts with label Baking. Show all posts

Saturday, 9 June 2012

Smarties Birthday Cake

It was my step Dads  birthday again (the big monkey cake was for him last year - click here to see that cake). As I had been really busy at work I had not had time to order the sugar-paste icing that I normally would to make a cake. So instead I came up with the idea of a smarties cake as I had seen it on the net and wanted to try it for myself!


To start, I made a basic chocolate sponge cake. Using my wizzy Cake Leveller from Lakeland (Click here for more info) I cut the cake in the middle and filled it with chocolate icing and then the same around the outside of the cake. Then the fun began...


 I first of all put Cadburys Chocolate Fingers around the outside of the cake...

I then tipped out all the Smarties into a bowl, made an 'M' shape with blue Smarties (M for Malcolm) and then filled in the gaps with the other coloured Smarties.

It was really easy and very effective. You need to be sure to check the amount of each colour Smartie you have to be sure there is enough the complete a whole row - orange is the worst for the amount you get, as you can see I have no orange row -  I just had to eat them of course!! A quick and tasty cake that looks great in no time at all! Yummy Yummy!!!

Related Posts Plugin for WordPress, Blogger...

Sunday, 3 June 2012

Jungle Themed 1st Birthday Cake

Hi Everyone! So it's been a really long time since I last blogged but don't worry - I haven't stopped baking and making during that time! I am going to try and catch up a bit on some of the things that I have made recently, most of which are baking things.


First up I volunteered to make a cake for our friends babies first birthday party. They agreed and said I could do what ever design I liked - Yippeee!! I decided on a jungle theme as that is the style of his bedroom.


Once I had decided upon the theme I got the cake tin (borrowed from a cake shop) and ordered all the icing...lots of it!!!


I don't know if you noticed, but I was a little concerned when I got the cake tin and saw it had no bottom!! Ideal for getting the cake out when it's cooked, but how on earth do you hold the mixture in it?? Luck for me my chef fiance solved my problems and he lined it carefully with tin foil. It worked fantastically. 


Once out the oven and completely cooled I then did the initial lining of icing. You probably can't tell but underneath the icing is a layer of jam!! I wasn't sure how this was going to turn out, but as I didn't feel confident cutting the cake in half and they wanted jam and icing I layered it on top underneath the icing and it was brilliant!


So now its time to introduce you to the cast of the cake:


Ella Elephant

Gia Giraffe

Mike Monkey


 Louis Lion


And the final piece, with it all put together: 


This cake probably took me about 8 hours to make from start to finish. I was very pleased with the final result and so were the people who I made it for -  and that's the main thing!!

Saturday, 7 January 2012

Chocolate & Marshmallow Cupcakes

Here is another flavour experiment I decided to do for some new tastes. Chocolate and Marshmallow cupcakes.


I used the same recipe as my blueberry cupcakes (see below) but added a tablespoon of coco powder to replace a tablespoon of flour and added chopped up marshmallows to the mixture.


I decorated the cupcake with a vanilla icing and, as you can see, a marshmallow on top and red edible glitter (my favourite decorating item of all time).


I was told they were very very yummy (as I couldn't eat them with the marshmallows in).

It is so easy to experiment with flavour, what will you try next???

Wednesday, 30 November 2011

Blueberry Shortcake Cupcakes

Hi Everyone! A mid-week post - how exciting!!!

I have not done some baking for a while as I have been a busy crafty bee, so decided it was time to have a go at the cupcakes again. I decided to be a little more adventurous with my cupcakes today, as I wanted something a bit different besides vanilla.

One flavour took me a while to think up, but after thinking of lots of combinations to put together, I came up with:

Blueberry Shortcake Cupcakes


I really love blueberries and they are an excellent antioxidant for the winter time. I kept thinking about different flavours that might go well and I decided on shortcake. A quick look on the internet found no ready-made recipes for Blueberry Shortcake cupcakes, so I made my own up that I can share with you as I followed no one else's recipe.

1.Wash and cut the blueberries into quarters.


2. Crush some shortbread biscuits using a rolling pin.


Using your favourite vanilla cupcake recipe, make a normal batter mix:

3. 125g butter and 125g sugar - whisk together.


4. Whisk 2 large eggs then add to the butter and sugar mix adding a tablespoon of the 125g of flour to stop the mixture separating. 


5. At this point I added my blueberries and gave them a little whizz around the mixture. 


6. Fold in the crushed shortbread biscuit and the remaining  flour.

7. Add a 1/4 teaspoon of vanilla paste or a teaspoon of vanilla extract.

8. Add 2 tablespoons of semi-skimmed milk.

9. Put the mixture into cupcake cases.

 LORNA'S TIP: I put paper cases into silicone cupcake cases and the silicone cases support the paper cases, so the batter doesn't push the sides of the cases. You can then take them out the silicone cases once they have cooked and they are in the paper cases so you can give them to people! 

ICING AND DECORATING

I like to get my decoration bits and icing made during the cooking and cooling time of the cupcakes.

1. Roll out some Regal / Sugar paste icing. 


LORNA'S TIP: Make sure you put lots of icing sugar under the sugar paste, but also put some clingfilm over the top of the icing so you rolling pin doesn't stick to the icing. Also, roll out in one direction, rather than going backwards and forwards. 

2. Using a small flower cutter, cut out a enough flowers for all your cupcakes. 

3. Put a blueberry in the centre of the flower. 


4. Next, making a butter icing by mixing 75g of butter with 225g of icing sugar, 2 tablespoons of milk and 1/4 teaspoon or vanilla paste.


5. Add a little a bit blue food colouring and even less red food colouring and mix into the icing to create a nice purple colour icing.

FINISHING TOUCHES

Once your cupcakes have completely cooled, using a piping bag and nozzle, pipe the purple icing onto the cupcake and put the flower on top.


I then decorated my cupcakes with sugar pearls to finish them off.


Have fun and enjoy making these, something that looks a bit different or something completely different!! What fun styles can you come up with?

Saturday, 5 November 2011

Hi Everyone! I hope you are having a lovely autumn day. I have a couple of thing I want to share with you this  of things I have been doing this week...


First up,last Saturday I travelled to London's Olympia where the Yoga Show was being held and took part in the Om Yogathon 2011! This was where lots of people did 108 Sun Salutations lead by top Yoga teachers to raise money for a charity of their choice. I chose Giving Africa which is a charity that raises money to help build schools in Africa. It took 2 1/2 hours to complete and I have raised over £200 (accurate total to come later). I was very pleased with myself for completing it, and for raising lots of money.


Secondly, last Sunday I was feeling really chilly so decided to make myself some homemade soup. I saw a man demonstrating making soup at the Yoga show and it really inspired me. I had never made soup before but with the help of my chef fiance and a bit of guessing it turned out lovely! Here are the steps:


1. Chop up the veg in your fridge with a bit of garlic, add to a pan and allow the veg to gently "sweat" in a little oil.
2. After the veg has started to brown, add a little veg stock.
3. After about 5 mins (veg getting soft), add it all to a blender.


4. Whizz it for a little while.


5. There you have it! A lovely veg soup, perfect for my lunch!
You can sieve it after if you don't want any bits in it, but I quite liked the bit :o)


IT TASTED YUMMY YUMMY!!!!

Thursday, 27 October 2011

Wedding Cupcakes

Hi everyone! Huge apologies for my absence I have been so busy what with a new term starting. I have also been busy wedding planning for my wedding next August! I have however, been busy as always doing lots of different crafty bits, I just have not had time to upload them.


As its half term week  I can share with you something special my cousin and I have been doing....


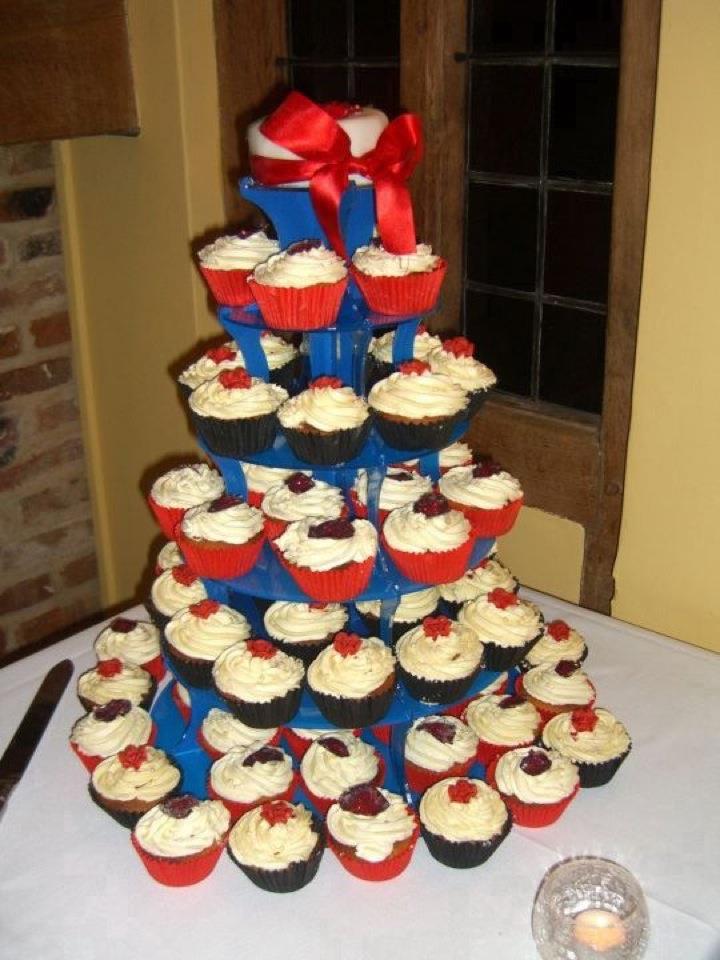
My aunty got married on Friday 21st October 2011, and she decided not to have a wedding cake (crazy, I know). So my lovely cousin Holly and I decided that this would be too strange and as she has just as much love for baking as I do, we decided on the crazy task of making enough cupcakes for everyone at the wedding...Thats 90 people!!!


A week before the wedding we decided to have a rehersal of the cupcake mix and the decorating to check all was ok (any excuse to bake). And this is what we produced:


We used blue and red for the rehersal, but for the actual wedding we used black and red as my aunties dress was a beautiful black Vivienne Westwood and she had red roses as a theme.


We decorated some of the cakes with dried roses that we created by coating the petals in egg whites and sugar:


We then decorated the other cupcakes with roses we made from sugarpaste. Each one we hand crafted:


This is a picture of the actual 83 cupcakes (we ran out of icing for the remaining 7) and the mini cutting cake on the top complete with stand... What do you think?


Wednesday, 7 September 2011

Baby Shower Cupcakes

I offered to throw a baby shower for one of my friends who was expecting. I was putting on nibbles but decided to make some really nice cupcakes for everyone to take home. 


We weren't sure if it was a boy or girl so I decided to make the cupcakes both blue and pink.
Once washed, I then gave my friend the rubber ducky family to keep.
Quack!!

Tuesday, 23 August 2011

Vets Pets

About a month ago my cat, Wiley, broke his leg either from being hit by a car or having a bad fall. The vet said that it was a unusual break so had to go and see the specialist to have his leg pinned back together (poor little man). We have always had insurance for our moggies, so he was able to have the best care available.
Wiley sucking on his favourite blanket - home comforts.
The poorly leg with the big op scar.

As a thank you to the specialists for taking such great care of our precious pussycat  I decided to make them some Wiley Biscuits as a thank you for making him better (and putting up with his constant howling while stuck in the cage). 


To Make:

  1. I used a normal biscuit mix (from 'The Book of Great British Baking') to make the dough.
  2. I then lightly place a cat cutter on top of the dough - don't press down! Instead, cut AROUND the edge of the cat cutter, so you can see the biscuit under the icing (as shown above). 
  3. Once the biscuits had cooked and cooled, I rolled out some white sugar paste and pressed the cat cutter into it, creating the cat face shape.
  4. Using sugar paste and water as a glue I stuck the sugarpaste icing to the biscuit. 
  5. Finally, I  drew on the cat faces with icing pens

Monkey Man Birthday Cake

This is a two tiered Chocolate and Vanilla cake I made for my step-dad's 60th birthday party. I purchased a really good book called 'Beginners Guide to Cake Decorating' which helped guide me with decorating.

Monkey Birthday Cake

 I have made cakes before using sugarpaste, but this was my first 2 tiered cake with a sugarpaste monkey on top! It took several hours and lots of patience but was well worth it!


xxxxxxxxxxxxxxxxxxxxxxxxxxxxxxxxxxxxx
Related Posts Plugin for WordPress, Blogger...